
Your packaging is the first impression buyers get of your brand. It protects your items, builds trust, and can even boost repeat sales. Poor packaging risks damage, refunds, and bad reviews, while good packaging ensures safe delivery, happy customers, and potential cost savings.
Key Takeaways:
- Fragility and Size: Assess fragility and measure items accurately to choose the right packaging and avoid extra shipping costs.
- Outer Packaging: Use materials suited to your items - poly mailers for clothing, sturdy corrugated boxes for fragile items, and padded mailers for smaller goods.
- Cushioning: Protect items with layers like kraft paper, bubble wrap, or eco-friendly options such as honeycomb paper.
- Eco-Friendly Choices: Reuse materials, opt for recyclable supplies, and inform customers about your sustainable practices.
- Sealing and Labeling: Use strong tape (e.g., water-activated) and follow proper labeling techniques to avoid transit issues.
Your packaging isn’t just about protection - it represents your business. A well-packed item can lead to glowing reviews and loyal customers.
How I Pack Antiques for Shipping – Avoid Damage!
sbb-itb-d4aa959
Assessing Item Fragility and Size
Before choosing packaging materials, it’s important to know exactly what you’re shipping. A delicate vintage ceramic vase, for example, needs far more careful handling than a sturdy 1980s denim jacket. Start by evaluating your item’s fragility and dimensions to determine the right approach.
Understanding Fragility Levels
Vintage items can range from sturdy to highly fragile. Durable goods like textiles, leather bags, and clothing usually require minimal protection. A layer of acid-free tissue paper is often enough to prevent wrinkling or colour transfer. These items can typically be shipped safely in poly mailers or paper bubble mailers without much concern for damage.
Fragile items, however, demand extra care. Ceramics, glassware, and figurines with delicate features - like handles, thin necks, or protruding parts - need specialised protection both inside and outside the package. Hollow items, such as vases, are especially vulnerable since their walls can collapse under pressure. To strengthen them, fill the interior with tissue or bubble wrap. Flat, fragile objects like plates or mirrors are strongest along their edges, so it’s better to ship them upright rather than flat to prevent breakage from compression. Remember, packages in transit may be dropped from heights of 0.9–1.8 metres or have 23–91 kg of weight stacked on top. To ensure your item is secure, try the "shake test." Seal the box and give it a moderate shake - if you hear rattling, the packaging isn’t secure enough.
Once you’ve assessed fragility, the next step is precise measurement. This will help you pick the right box size and ensure the item is protected.
Measuring Dimensions and Weight
Accurate measurements are key to selecting the right box and calculating shipping costs and potential profit margins. For small items, a digital kitchen scale works well, while larger pieces can be weighed using a bathroom scale. Simply weigh yourself holding the package, then subtract your weight without it.
Measure the item’s length, width, and height at its widest points. Fragile items need extra space for cushioning - allow for 5–7.5 cm of padding on all six sides. After packing, measure the box’s outer dimensions. Carriers often calculate costs based on "dimensional weight" (volume) rather than the actual weight if the box is large but light. Oversized boxes can lead to higher shipping fees since you’re essentially paying to ship air.
Here’s a quick reference for typical item weights:
| Item Type | Approximate Weight |
|---|---|
| Vintage hat or scarf | 100 g |
| T-shirt | 150 g |
| 400-page book | 300 g |
| Pair of jeans | 550 g |
| Pair of men's trainers | 850 g |
For irregularly shaped items or those with protruding parts, measure from the furthest points. Secure these areas with extra padding, like tissue or bubble wrap, before boxing. To avoid costly mistakes, measure everything at least three times before finalising your box size.
Choosing the Right Outer Packaging
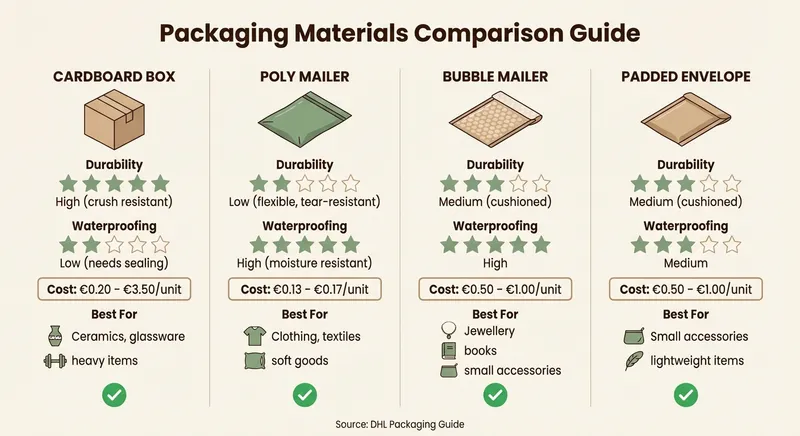
Packaging Materials Comparison Guide for Vintage Resellers
Once you’ve figured out your item's fragility and dimensions, it’s time to pick the outer packaging. This step connects your understanding of the item's needs with material choices that protect your goods while keeping costs manageable. The trick is finding the right balance between durability, waterproofing, and affordability.
Comparison of Packaging Types
Different packaging materials serve different purposes. Here’s a breakdown of the most common options:
| Packaging Type | Durability | Waterproofing | Typical Cost | Best For |
|---|---|---|---|---|
| Cardboard Box | High (crush resistant) | Low (needs sealing) | €0,20 – €3,50/unit | Ceramics, glassware, heavy items |
| Poly Mailer | Low (flexible, tear-resistant) | High (moisture resistant) | €0,13 – €0,17/unit | Clothing, textiles, soft goods |
| Bubble Mailer | Medium (cushioned) | High | €0,50 – €1,00/unit | Jewellery, books, small accessories |
| Padded Envelope | Medium (cushioned) | Medium | €0,50 – €1,00/unit | Small accessories, lightweight items |
"Always choose a high-quality corrugated cardboard box and avoid re-using old boxes as they lose their rigidity." – Anna Thompson, Discover content team, DHL
For heavy or extra-fragile vintage pieces, double-wall or triple-wall boxes are your best bet. While single-wall boxes can handle up to 23 kg, double-wall versions support up to 45 kg. Reusing old boxes isn’t recommended for fragile items since cardboard weakens over time, reducing its ability to protect your goods.
Matching Packaging to Item Type
Your packaging choice should suit the specific needs of your vintage items. For example:
- Clothing and textiles: Use water-resistant poly or paper mailers to keep weight and costs low. These work well for items like vintage denim, scarves, or blankets.
- Jewellery and small accessories: Ship these in padded envelopes or small boxes to avoid scratches or damage.
- Ceramics, glassware, and china: Corrugated boxes are the safest option. For extra protection, consider the box-in-box method - place the item in a smaller box, then position it inside a larger box with at least 5 cm of padding.
- Books and paper items: Bubble mailers or rigid mailers are ideal. For flat items like vintage maps or prints, sandwich them between two pieces of stiff cardboard inside the mailer to prevent bending.
- Shoes and heavy boots: Due to their weight and structure, these require strong corrugated boxes.
Make sure the box’s internal dimensions closely fit your item to avoid unnecessary empty space. Oversized boxes can increase shipping costs because carriers often calculate rates based on dimensional weight - essentially charging you for shipping air.
Selecting Cushioning and Protective Materials
Once you've decided on your outer packaging, the next step is choosing cushioning materials that can absorb shocks, prevent scratches, and keep your items secure. The goal? To do this in a way that's both cost-effective and environmentally friendly.
Cushioning Materials and Their Uses
A solid protective strategy involves three layers: a surface protector, a cushioning layer, and stabilization. Start by shielding delicate surfaces with tissue paper or glassine.
For the cushioning layer, honeycomb kraft paper has become a favorite eco-friendly choice over plastic bubble wrap. Its expandable, three-dimensional structure absorbs shocks effectively and is fully recyclable. Plus, it often eliminates the need for tape. If you're shipping heavier or fragile items like pottery, corrugated bubble wrap offers sturdy, sustainable protection.
To stabilize items, use corrugated inserts to create compartments - perfect for multi-piece sets like vintage mugs or stemware. This method locks each item securely in place. Fill any empty spaces with shredded or crumpled kraft paper. For irregularly shaped items, biodegradable cornstarch-based peanuts are an excellent option.
"Protective packaging does not have to be plastic heavy or wasteful. Today's consumers expect sustainable solutions." – EcoPackables
Always wrap items individually and position fragile pieces at the center of the box, ensuring at least 5 cm of cushioning on all sides. If you notice any movement within the box, add more void fill. These steps not only protect your items but also align with sustainable packaging practices.
Eco-Friendly Packaging Alternatives
Sustainability is key when it comes to protective packaging - especially when you consider that around 91% of packaging waste ends up in landfills or oceans. To address this, consider adopting mono-packaging, which pairs a cardboard box with compatible fillers. This approach aligns with the EU's Packaging and Packaging Waste Directive.
There are plenty of ways to stay eco-conscious. Reuse clean materials from incoming shipments or repurpose old textiles for cushioning. If you're a frequent shipper, shredding old boxes into biodegradable filler can be a practical solution.
When purchasing new supplies, opt for materials that meet EU recycling standards, like kraft paper, molded pulp, or honeycomb paper. And don't forget to let your customers know - 80% of consumers prefer brands that use eco-friendly materials. Highlighting your sustainable choices can make a real difference.
Balancing Cost and Environmental Impact
When it comes to protecting items, finding the right balance between cost and eco-friendliness is key for long-term success. The good news? Sustainable packaging doesn’t have to break the bank. In fact, 74% of consumers are willing to pay more for eco-friendly packaging. By making smart choices, you can cut costs while staying mindful of the planet.
Reusing and Recycling Packaging
Start by rethinking what you already have. For example, collect clean, sturdy boxes from your own deliveries or grab unused cardboard from local collection points. Just make sure the packaging is clean, dry, and in good condition - steer clear of anything that once held food, as it may carry odours or allergens.
Before reusing a box, remove or completely cover old shipping labels to avoid confusion during transit. Want to add a polished touch? Stamp your logo on the box or use branded stickers. Inside, fresh tissue paper can elevate the unboxing experience - even if the outer box is recycled. Including a small note about your reuse efforts can go a long way with eco-conscious buyers, showing them your commitment to reducing waste.
If you’re shipping frequently, consider investing in a cardboard shredder. This handy tool turns old boxes into cushioning material, which aligns with "mono-packaging" principles - making it easier for customers to recycle everything together. Plus, did you know that 85% of cardboard recycling comes from old boxes, requiring only 15% new fibre? It’s an efficient way to keep materials in circulation.
Once you’ve maximized your reuse efforts, it’s time to explore cost-effective supplies that align with your sustainability goals.
Choosing Affordable Supplies
After reusing what you can, focus on affordable materials that deliver both reliability and eco-friendliness. The type of tape you use, for example, can make or break your packaging success. Here’s a quick guide to help:
| Tape Type | Adhesion Strength | Cost | Best For |
|---|---|---|---|
| Packing Tape | High | Moderate | Standard shipping; secures box seams |
| Water-Activated Tape | Very High | Higher | Heavy or valuable items; tamper-proof and eco-friendly |
| Biodegradable Paper Tape | High | Moderate | Eco-friendly branding with durability |
| Masking Tape | Low | Low | Not suitable for shipping |
| Transparent/Scotch Tape | Low | Low | Not suitable for shipping boxes |
For additional savings, think about upgrading to a thermal printer. It eliminates the need for costly ink and toner while producing sharp, professional shipping labels. Also, take advantage of shipping software discounts - some sellers save up to 90% on postage for packages under 9 kg.
Securing and Labeling Packages for Safe Delivery
Once you've chosen the right packing materials, the next step is to ensure your package is sealed securely and labeled clearly. After wrapping and cushioning your vintage items, proper sealing and labeling are essential to protect them during transit. Skipping these steps or doing them poorly can lead to delays, damaged goods, or even lost packages - so it's worth getting it right.
Taping Techniques for Secure Packaging
For heavier or more valuable items, go with the H-Seal method. This involves taping the center seam and all four edges on both the top and bottom of the box, creating an "H" shape. This approach strengthens the box and helps prevent it from popping open during handling and shipping.
For lighter packages, the C-Seal method works well. Run a single strip of tape along the center seam, extending it slightly down the sides. Use shipping tape that's 48–50 mm wide. While standard polypropylene tape is reliable for most shipments, reinforced tape with added texture is better for heavier loads. Avoid using masking tape, duct tape, or string - these materials aren't strong enough for shipping and could even jam sorting machines.
If you ship often, a tape dispenser can make the job easier and ensure consistent pressure for a tighter seal.
Labelling Fragile Items and Meeting Regulations
Place the shipping label on the largest flat surface of the box, ideally in the top-right area, to make it easy to read. Avoid placing labels over seams, corners, or taped areas, as this can create creases that interfere with barcode scanning. To be extra cautious, include a duplicate label inside the box. That way, if the exterior label falls off, carriers can still identify the package.
"Parcels with poorly readable shipping labels are a missed opportunity for a good delivery." – PostNL
Before sending the package, remove or cover any old labels, barcodes, or hazardous material stickers to prevent confusion during sorting. For international shipments outside the EU, attach at least three copies of the customs invoice in a clear plastic sleeve labeled "Customs". Also, avoid covering barcodes with shiny tape or shrink wrap, as reflections can disrupt scanners.
Taking these extra steps ensures your package is ready for a smooth journey to its destination.
Conclusion
When choosing packaging, focus on your item's specific needs, protective materials, cost efficiency, and secure sealing methods.
Here's a thought to keep in mind about customer experience:
"Packaging plays a big part in how your customers experience your service. It's not just about getting items from A to B. It's about making sure they arrive in one piece, look the part and remain cost-effective." – Post Office
Your packaging isn't just a box - it's a representation of your business. For many customers, it's the only physical interaction they'll have with your brand. A carefully packed item not only protects your goods but also builds trust, encourages repeat purchases, and can lead to glowing reviews. These elements are crucial for growing a successful vintage reselling business.
The good news? Packaging doesn’t have to cost a fortune. Reusing sturdy boxes, selecting the right parcel size to avoid extra shipping fees, or even including a small, handwritten note can elevate the unboxing experience without stretching your budget.