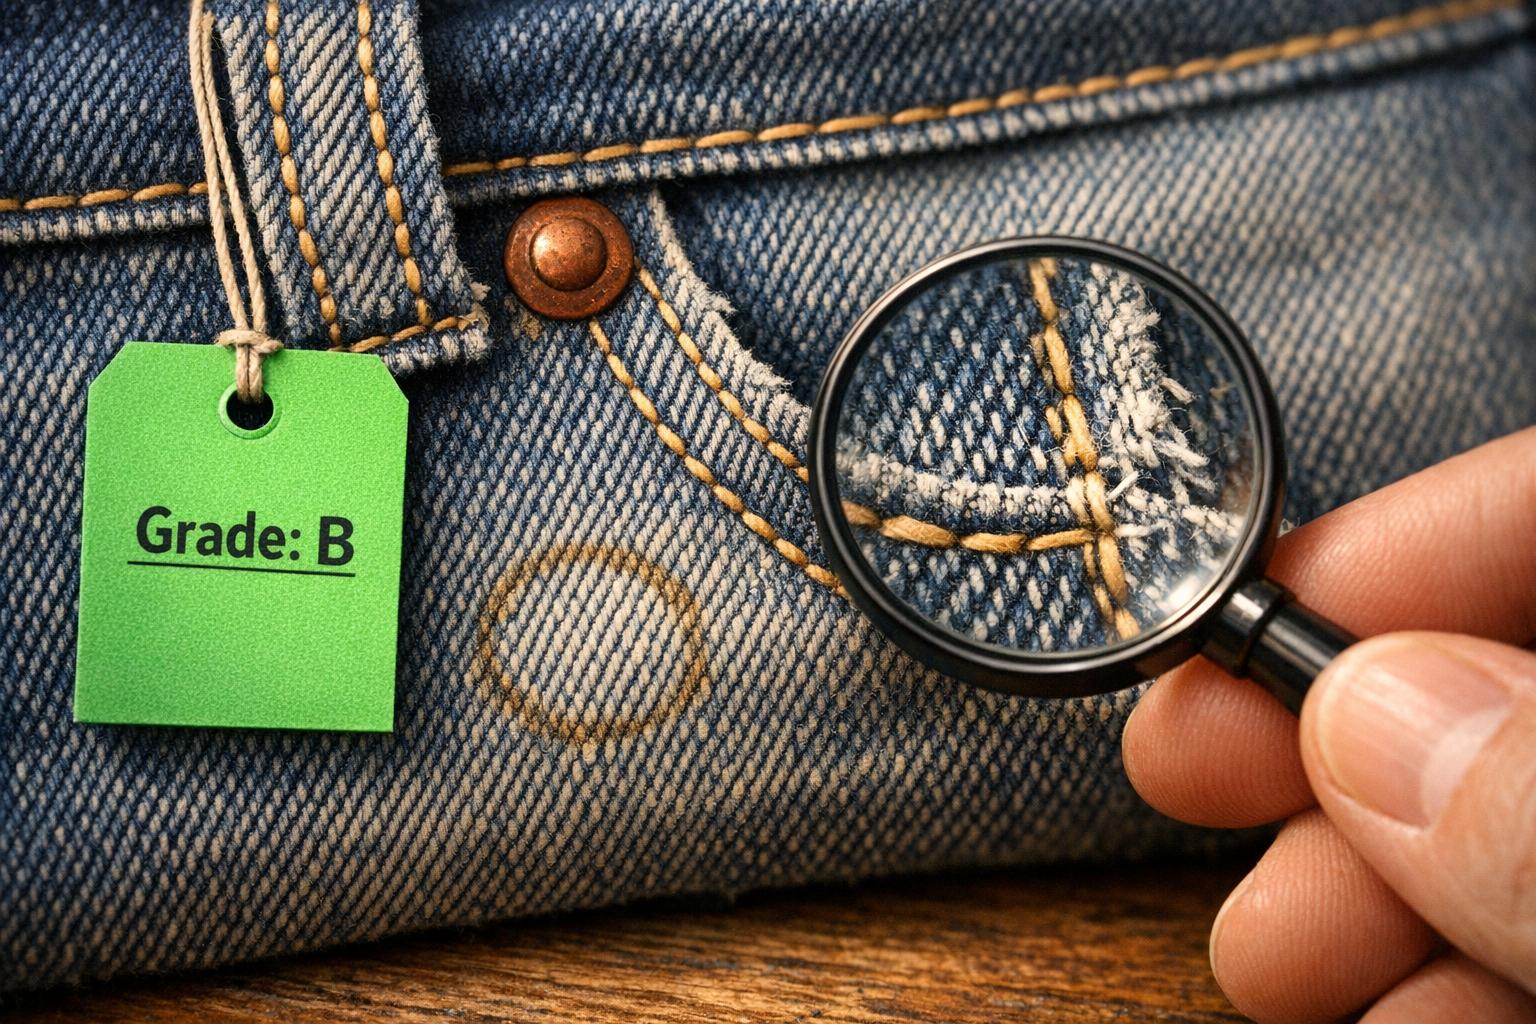
When it comes to reselling vintage items, condition is everything. A €40 vintage find can turn into a €200 sale if you assess its condition accurately. Here's what you need to know:
- Grading Matters: Use categories like Mint, Good, or Fair to evaluate items. The condition can affect value by up to 500% for identical pieces.
- Honesty Builds Trust: Clear descriptions of flaws, like stains or weak seams, reduce returns and boost repeat buyers.
- Check Key Areas: Inspect fabrics for wear (e.g., dry rot in vintage cotton), seams for durability, and hardware like zippers and buttons for functionality.
- Document Everything: Use a checklist to note fabric integrity, stains, odours, and graphics quality. This ensures accurate pricing and buyer satisfaction.
If you want to scale your vintage reselling business, tools like VintiePlus can streamline inventory sourcing and pricing research.
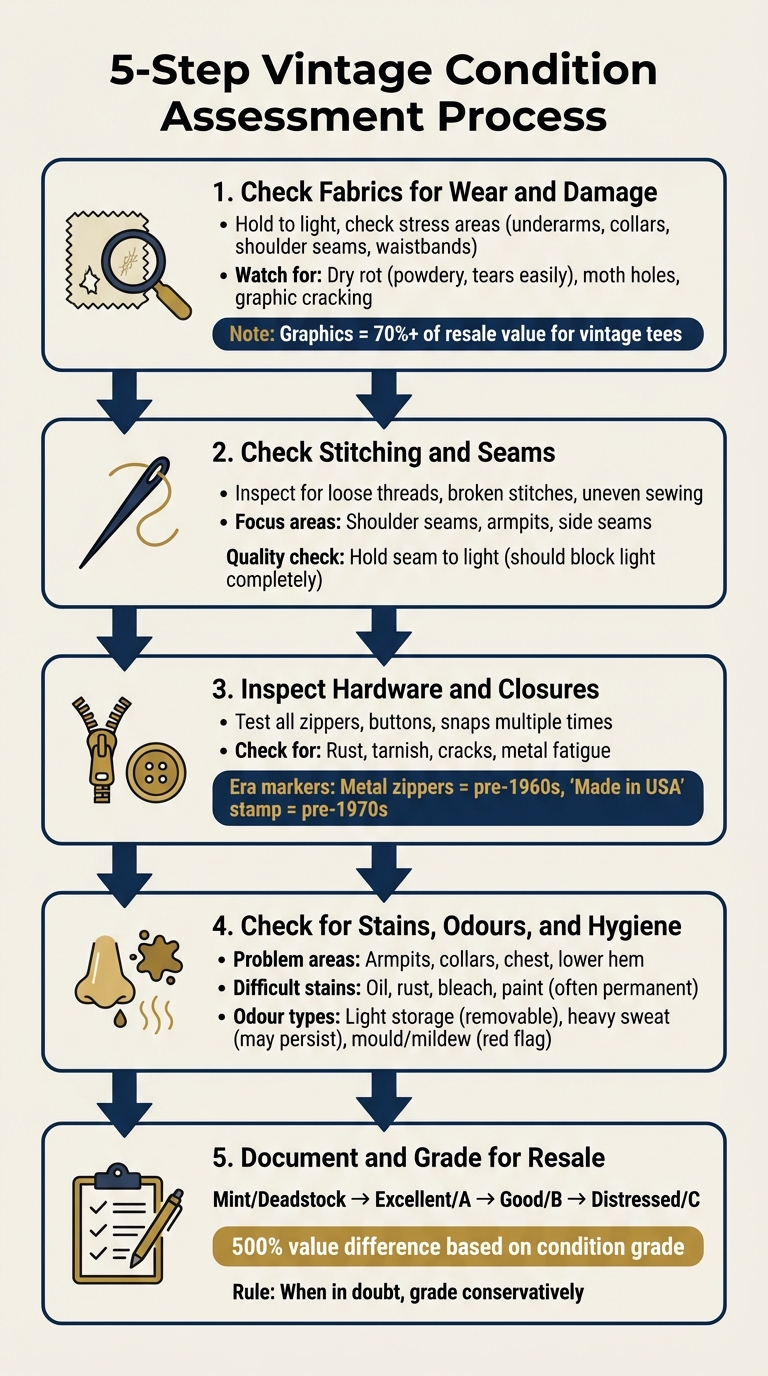
5-Step Vintage Condition Assessment Process for Resellers
eBay Clarifies New Conditions for Pre-Loved Clothing - Your Q&A
While eBay is updating its standards, you can also improve your performance on other platforms by using Vinted selling tips to maximize your resale profits.
sbb-itb-d4aa959
Step 1: Check Fabrics for Wear and Damage
The condition of the fabric plays a big role in determining whether a vintage piece can handle regular use. Even the most stylish garment loses its charm if the fabric is weak - it simply won’t hold up to everyday wear or washing.
Spotting Common Fabric Wear
Start by inspecting areas that endure the most stress, like underarms, collars, shoulder seams, and waistbands. These spots often face the most tension and friction. A great trick is to hold the garment up to a bright light - this helps you spot any thinning or weak patches that might not be obvious at first glance.
One common issue in vintage cotton t-shirts, especially from the 1980s and 1990s, is dry rot. This happens when the fibres break down over time due to age and poor storage conditions. The fabric feels powdery and tears easily under light tension. As Hissen Vintage puts it:
If fabric tears easily under mild tension, it must be downgraded immediately. Dry rot overrides visual appeal because the garment will not survive normal wear.
Don’t forget to check for moth holes, which appear as small, irregular openings in wool and other natural protein fibres. For vintage graphic items like band tees, examine the prints closely for signs of cracking, peeling, or flaking. The print’s condition can make up more than 70% of the resale value for these items.
Once you’ve done a thorough visual inspection, it’s time to test the fabric’s strength.
Testing Fabric Durability
A simple durability test can confirm any wear-and-tear issues you noticed earlier. Gently pull at stress points like collars, hems, and seams. If the material feels brittle, makes a cracking sound, or tears with little effort, the fabric’s structure is likely compromised.
Pay special attention to tight armholes, a common feature in pre-1970s designs, as these areas are prone to sweat damage and friction wear. Also, run your fingers over the fabric to check for a "crunchy" texture. This is often a sign that the fibres are deteriorating and may not survive a trip through the washing machine.
Step 2: Check Stitching and Seams
Once you've assessed the fabric, it's time to shift your focus to the stitching and seams. These elements play a key role in determining the garment's overall quality and resale potential. Plus, they help you provide accurate descriptions of the item's condition and set an appropriate price.
Inspecting Seam Quality
Begin by carefully examining the seams for any signs of wear or flaws. Look out for loose threads, broken stitches, or uneven sewing patterns - these can indicate poor craftsmanship or structural weakening. Pay extra attention to areas that endure a lot of stress, such as shoulder seams, armpits, and the side seams of trousers or jeans. These are often the first spots to show signs of failure.
A handy trick: hold the seam up to a bright light. A well-made seam should block light completely. If you notice gaps letting light through, it means the stitch density is too low, which could lead to fraying. Turn the garment inside out to inspect the interior. High-quality vintage pieces often have a polished look on the inside, with finished edges rather than raw or frayed fabric. Be on the lookout for puckering or bunching along seams, as this suggests issues like poor tension during sewing or subpar quality control.
Once you've confirmed the seams are intact, take a closer look at any repairs to evaluate their quality.
Spotting Poor Repair Work
Repairs can significantly affect a garment’s durability and value, so it's important to check them thoroughly. Look for repair threads that match the fabric or are slightly darker, as this tends to blend better. Test repaired seams, especially in high-stress areas, to see if they hold up under tension. Repairs with irregular stitches or visible strain are less reliable and can lower the item's resale potential.
Step 3: Inspect Hardware and Closures
Once you've ensured the fabrics and seams are in good shape, it’s time to check the hardware. Functional components like zippers, buttons, and clasps not only affect how wearable a vintage piece is but also play a big role in its resale value.
Testing Hardware Function
Start by testing each closure to ensure it works smoothly. Run zippers up and down their full length to check for any catching or skipping teeth. Metal zippers are often a sign of pre-1960s garments, while nylon zippers became the standard around 1963. Flip the garment inside out and gently pull along nearby seams - this can help reveal any hidden thread rot or fabric weakness.
For buttons and snaps, fasten and unfasten each one multiple times. Vintage buttons can be made from delicate materials like bone, shell, wood, or early plastics such as Bakelite and Lucite. Handle these with extra care, as they’re more fragile than modern plastic buttons. To test for Bakelite, rub a Q-tip dipped in Formula 409 on the button; a yellow tint confirms it’s genuine Bakelite. Additionally, check metal zippers for a "Made in USA" stamp - this is often a sign of authentic pre-1970s hardware.
Once you’ve confirmed the hardware works properly, shift your focus to its appearance.
Checking for Cosmetic Damage
Even if the hardware functions well, its resale value can drop if it’s cosmetically flawed. Look for tarnish, rust, scratches, or fading on metal components. Authentic vintage hardware is usually made from heavier materials like brass, copper, or iron, which differ from the lighter, cheaper materials often used in modern reproductions. A natural patina, caused by age and oils, can enhance the piece’s charm and verify its authenticity. However, if the patina looks too uniform, it might be a sign of a reproduction.
Designer hardware deserves special attention, as original elements can significantly boost a piece’s value. Kyle Payton from ThriftCart explains:
Authentic Chanel buttons, YSL buckles, or designer zippers will always be worth more than a piece that looks great but has those elements replaced with generic versions.
Lastly, check for structural damage like hairline cracks, splitting, or dents, which could indicate metal fatigue. If there are any issues, make sure to note them in your listing. Being upfront about flaws helps manage buyer expectations and can influence pricing decisions. For more tips on maximizing your profits while reselling, stay updated with the latest industry trends.
Step 4: Check for Stains, Odours, and Hygiene Problems
Once you've confirmed the hardware is in working order, it's time to focus on cleanliness. Stains, odours, and general hygiene issues can severely affect a garment's resale value, even if it’s otherwise in great condition.
Finding Stains and Discolouration
Bright, strong lighting is your best friend when hunting for stains and discolouration. Subtle marks, like faint yellowing or tiny brown spots (often called "foxing"), can easily go unnoticed in dim light. Pay special attention to common trouble areas: armpits (prone to sweat stains), collars, chest areas (food or oil splashes), and the lower hem. Don’t forget to turn garments inside out - this can reveal hidden stains or evidence of past attempts to clean mould or mildew, which often leave lasting marks.
Some stains are harder to deal with than others. For instance:
- Oil, rust, bleach, and paint stains often penetrate deeply and can be nearly impossible to remove without damaging the fabric.
- Sweat yellowing varies in severity depending on the material and garment age.
- Foxing (those small brown spots on older cotton or linen fabrics) may come off with specialised vintage textile soaks, but success isn’t guaranteed.
As Circa Vintage Clothing explains:
A garment with foxing should be very inexpensive, especially if the stains won't come out (which is always a possibility).
The location of a stain also matters. A small, permanent mark in a noticeable spot, like the centre of the chest, can hurt a garment’s value far more than faint marks near the hem.
When in doubt, assume stains are permanent unless proven otherwise. Overestimating your ability to clean them may lead to buyer dissatisfaction and could harm your reputation.
Once stains are assessed, move on to checking for odours.
Detecting Odours and Cleanliness Issues
Odours can be just as problematic as visible stains. Persistent smells from smoke, perfume, or moisture can deeply embed into certain fabrics, especially natural ones like wool and cotton, making them harder to remove than from synthetics. Professional garment graders typically classify odours into three categories:
- Light storage smells: Often removable with a standard wash.
- Heavy sweat odours: These can deeply saturate fibres and may never fully disappear.
- Mould or mildew smells: These are automatic red flags due to health risks and potential fibre damage.
If odours are present, consider the treatment options. For washable garments, try white vinegar in the fabric softener compartment or a 1:2 mixture of cleaning alcohol. For items that can’t be washed, placing them in the freezer overnight may help neutralise smells.
Finally, ensure garments are completely dry before storing them. Even slightly damp clothes can develop musty smells, undoing all your efforts.
Document your findings carefully to ensure accurate grading and pricing of the garment. Use a Vinted seller fee calculator to ensure your final price covers these cleaning costs while maintaining a healthy profit margin.
Step 5: Document and Grade Items for Resale
After thoroughly inspecting fabric, seams, hardware, and hygiene, it's time to document your findings and assign accurate condition grades. This step is crucial because it directly impacts your pricing strategy and how satisfied your buyers will be. For example, professional vintage sellers know that two identical 1994 band tees can have resale values that differ by as much as 500%, depending on their condition grade. Proper documentation not only supports your pricing decisions but also builds trust with buyers.
Building a Condition Checklist
A detailed checklist ensures nothing is overlooked during grading. Include these key areas in your checklist:
- Fabric Integrity: Look for dry rot, thinning, or weak spots.
- Structural Integrity: Inspect armpits, collar seams, shoulder seams, waistband elastic, zipper tracks, and buttonholes.
- Graphic Preservation: Check for crack density, ink flaking, peeling, and fading.
- Stain Classification: Note the type of stain, its location, and whether it’s removable.
- Odour Assessment: Identify storage smells, sweat odours, or signs of mould or mildew.
- Hardware Functionality: Ensure zippers, buttons, and closures are working properly.
Graphics often make up more than 70% of the resale value for vintage tees and sweatshirts. Most sellers rely on a 4–5 tier grading system to classify items:
- Mint/Deadstock: Pristine, unworn condition.
- Excellent/A: Light wear with no structural damage.
- Good/B: Visible wear, such as small holes (≤1 cm) or moderate cracking.
- Distressed/C: Significant wear, often suitable for rework.
When in doubt, grade conservatively. If an item is borderline between two grades, opt for the lower one. Over-grading can lead to returns and damage your reputation. Once your checklist is complete, you’ll have the foundation for detailed descriptions and accurate pricing.
Writing Clear Descriptions for Listings
Your listings should detail everything a buyer can’t see in photos. Include specifics like fabric type, dimensions, inner and exterior pockets, handle drop, metal fittings, and any included accessories. Non-visual details - such as odours (e.g., musty or perfumed), stickiness, or signs of dry rot - should also be clearly stated.
For printed items, describe the condition of the graphics, including crack density, ink flaking, peeling, and fading. If the item has authenticity markers, such as single-stitch hems from the 1980s–1990s, "Made in USA" labels, or era-specific tag designs, highlight these details to justify your pricing. When documenting stains, classify them by type (e.g., oil, rust, sweat, bleach, paint) and location. A stain on the centre chest, for instance, impacts value more than minor blemishes near the hem.
Include close-up photos of key stress points like base corners, handles, and zippers to show wear. Turn items inside out and use bright, consistent lighting to highlight seams and repairs.
Setting Prices Based on Condition
Base your pricing on the condition grade by researching actual "SOLD" prices for similar items rather than relying on current asking prices. Use marketplace filters to find completed sales, which give a more accurate picture of market value. Calculating the median price from 3–5 comparable sales helps you avoid skewed results from outliers.
Higher condition grades, such as Mint or Near Mint, can significantly increase an item’s value. Lower grades may limit your options to rework or parts-only markets. Deadstock or Mint items are rare - usually less than 5% of a bulk vintage inventory - so price these items accordingly. You might also consider setting two price points: a "Retail" price for higher-margin sales and a "Quick-sale" price for faster turnover.
For high-value items like rare books or ephemera, use archival Mylar protectors during storage to maintain their condition. Transparent and conservative grading helps align buyer expectations with the item’s actual quality, building trust and repeat business. With a reliable grading and pricing system in place, you’ll be ready to expand your operation with confidence by using tools to auto-buy underpriced secondhand products.
Conclusion
Key Takeaways
Assessing vintage clothing requires a detailed and methodical approach, as it directly affects profitability. Begin by testing fabric integrity - especially for items from the 1980s and 1990s, where dry rot can make them unsellable. Check fabric strength and inspect areas prone to wear, such as armpits and collar seams, by examining garments inside out. Pay close attention to the condition of graphic elements to ensure they remain intact.
Use a consistent grading system with clear, measurable criteria. A 4–5 tier scale (e.g., Mint, Excellent, Good, Distressed) works well, with specific thresholds like limiting holes to under 1 cm for a "Good" grade. As Hissen Vintage puts it:
If you do not grade correctly, you cannot price correctly. If you cannot price correctly, you cannot scale profitably.
Even two identical 1994 band tees can vary in value by up to 500%, depending solely on accurate grading.
Detailed documentation is crucial for building buyer trust and minimizing returns. Include close-up photos of flaws, precise measurements, and notes on aspects like odours. When pricing, focus on sold listings to understand what buyers are actually paying, rather than relying on active listings. With a solid grading process in place, you’ll be better positioned to grow your operations with confidence.
Scaling with VintiePlus

Once you’ve nailed consistent grading, scaling your business becomes much easier. VintiePlus offers tools to simplify the process, including 24/7 automated marketplace monitoring with custom filters to spot underpriced gems ahead of competitors. Its auto-buying feature secures high-margin inventory instantly, while advanced analytics help pinpoint which eras and styles yield the best profits.
For resellers handling larger volumes, VintiePlus provides batch label printing, unlimited account creation, and reshipper services. Plus, its active Discord community is a valuable resource for refining grading methods and pricing strategies. Starting at just €29,95 per month for the Basic Plan, VintiePlus transforms your grading expertise into a scalable system, boosting earnings while cutting down on manual work.